Setting an out-of-office message is crucial for managing your email communications when you’re away. Whether you’re on vacation, attending meetings, or out of the office for any reason, automatic replies can keep people informed of your absence. Outlook makes it easy to set up out-of-office messages on different platforms, including the desktop app, the web app (Outlook Web App or OWA), and your Android phone. This guide provides step-by-step instructions on how to do it across all three platforms.
How to Set an Out-of-Office Message in Outlook on Desktop, Web, and Android
1. Setting an Out-of-Office Message on the Outlook Desktop App

- Open Outlook and Navigate to the File Tab
- Open your Outlook desktop app and click on the File tab at the top left of the screen. This will open the main menu.
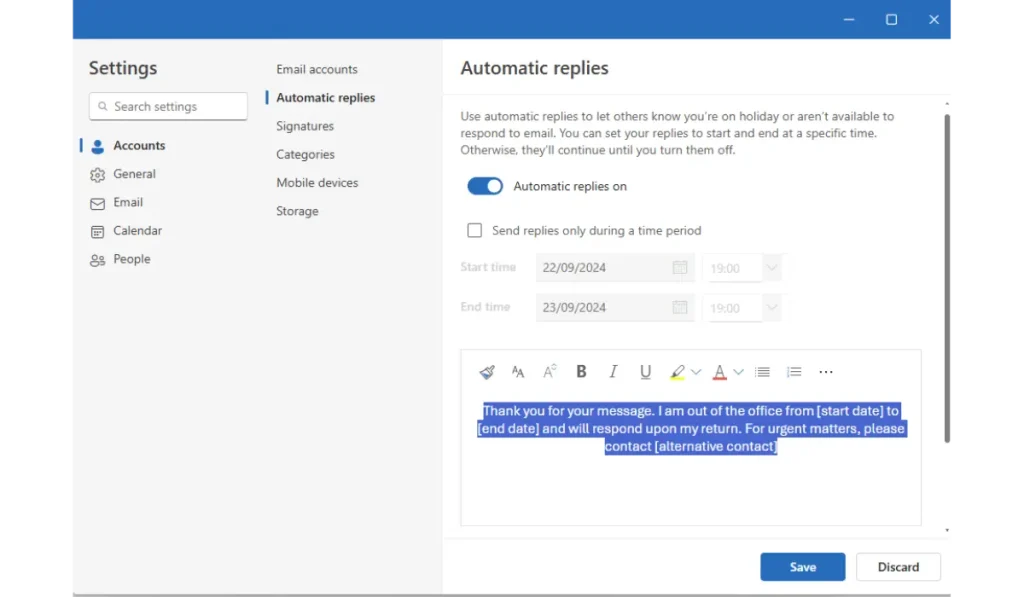
- Click on Automatic Replies
- From the menu, find and click on Automatic Replies. If you’re using an older version of Outlook, this may be labeled as Out of Office Assistant.
- Select Send Automatic Replies
- A new window will appear. Click on the checkbox to enable Send automatic replies. This will activate your out-of-office message.
- Set the Date Range for Your Out-of-Office Period
- You can specify the start and end times for when you want the automatic replies to be sent. For example, if you’re away from work starting on Monday and returning on Friday, set the respective dates and times.
- Compose Your Out-of-Office Message
- Write a message that informs people about your absence. Be sure to include:
- The dates you’ll be away.An alternative contact person if someone else is handling your responsibilities.Any other relevant details (e.g., whether you’ll have limited access to email).
- Write a message that informs people about your absence. Be sure to include:
- (Optional) Set Up a Separate Message for People Outside Your Organization
- You can write a different out-of-office message for contacts outside your organization. This is helpful for providing less detailed or more formal responses to external clients or contacts.
- Click OK to Save Your Settings
- Once you’re done, click OK to save the settings. Your automatic replies will now be sent within the specified time range.
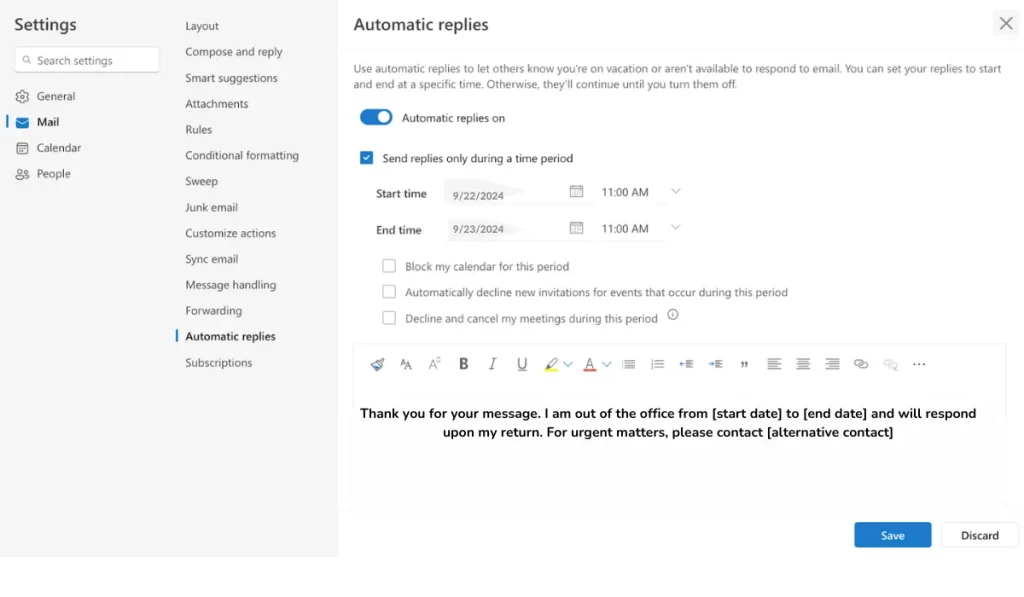
2. Setting an Out-of-Office Message on Outlook Web App (OWA)

- Log into OWA
- Go to the Outlook Web App by logging into your account through your browser.
- Click on the Settings Gear Icon
- In the upper-right corner of the page, you’ll see a gear icon (Settings). Click on it to open the settings menu.
- Go to View All Outlook Settings
- Scroll down in the settings menu and click on View all Outlook settings to access the full range of options.
- Select Mail > Automatic Replies
- In the settings menu, click on Mail and then find the Automatic replies option.
- Follow the Same Steps as in the Desktop App
- Set the date range, compose your message, and (if necessary) create a different message for external contacts. Once you’re finished, click Save.
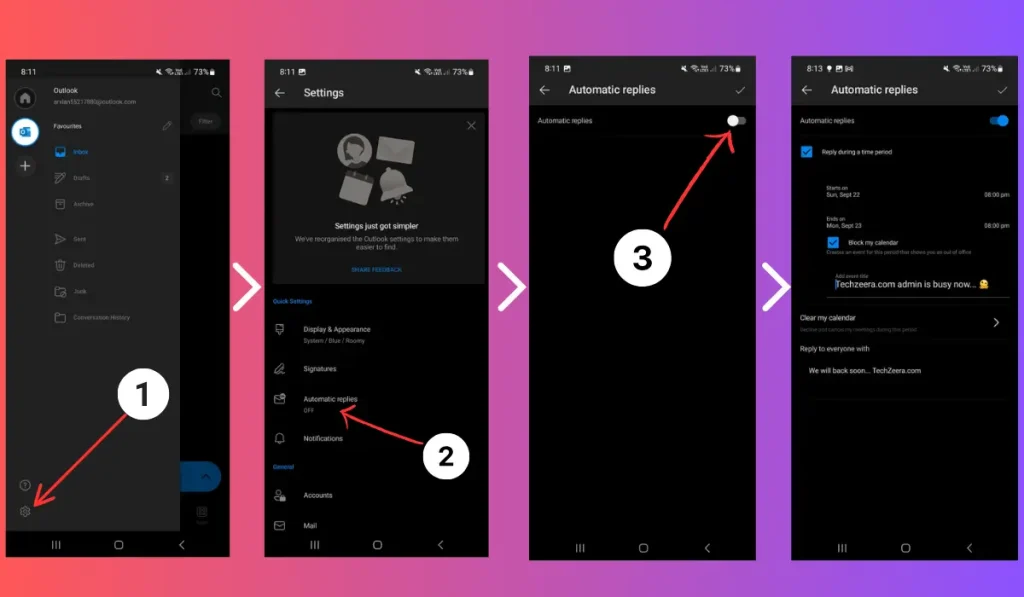
3. Setting an Out-of-Office Message on the Outlook Android App

- Open the Outlook App on Your Android Device
- Launch the Outlook app from your Android device.
- Tap the Three Lines in the Top Left Corner to Open the Menu
- In the top-left corner of the screen, tap the three horizontal lines (also known as the hamburger menu) to open the main menu.
- Scroll Down and Tap on Settings
- Scroll down and select Settings from the menu options.
- Select Your Account
- Choose the email account for which you want to set the out-of-office message.
- Tap on Automatic Replies
- In the account settings, you’ll see an option for Automatic Replies. Tap on it to open the settings.
- Toggle the Automatic Replies Switch to On
- Turn on the switch to enable automatic replies.
- Set the Start and End Dates for Your Out-of-Office Period
- Set the time frame during which your automatic replies will be active.
- Compose Your Out-of-Office Message
- Write your out-of-office message, including key details like your return date and an alternative contact if needed.
- Tap the Check Mark to Save Your Settings
- Once you’re done, tap the check mark in the top-right corner to save your settings. Your automatic replies will now be active during the specified dates.
Conclusion
Setting an out-of-office message in Outlook is essential for managing your email communications when you’re unavailable. Whether you’re using the desktop app, the web app, or the Android app, Outlook makes it easy to keep everyone informed while you’re away. By following these simple steps, you can ensure that people know when to expect a response from you and how to reach you if necessary.
Make sure to set up your out-of-office message before your next trip or day off. If you have any questions or tips on how to manage automatic replies, feel free to share them in the comments below!