The Windows Snipping Tool is a handy feature for capturing screenshots on your computer. Whether you want to grab a specific part of the screen, capture a full window, or save the entire display, the Snipping Tool makes it easy. But did you know you can open the Snipping Tool even faster by using a keyboard shortcut? In this guide, we’ll show you how to use the built-in shortcut for Windows 10 and 11, and how to create a custom shortcut if needed.
What is the Windows Snipping Tool?
The Windows Snipping Tool is a built-in feature that allows you to capture screenshots of any part of your computer screen. It offers different snip types like:
- Rectangular Snip: Capture a rectangular portion of the screen.
- Freeform Snip: Draw any shape to capture a custom snip.
- Window Snip: Capture the active window.
- Full-screen Snip: Capture the entire screen.
Note: In Windows 11, Microsoft introduced a new feature in the Snipping Tool that allows you to record your screen. While there is no direct shortcut to launch the video recording mode, you can access it by opening the Snipping Tool, switching to the Record tab, and starting your screen recording from there.
Default Keyboard Shortcut for Windows Snipping Tool

In both Windows 10 and Windows 11, you can easily open the Snipping Tool using a built-in keyboard shortcut. Here’s how:
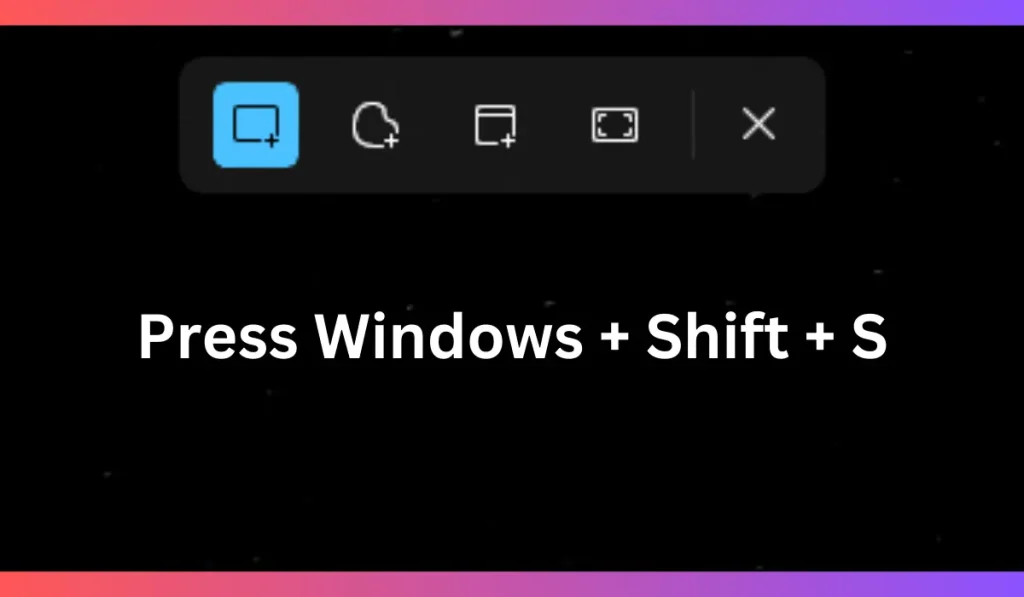
- Press Windows + Shift + S
This opens the Snipping Tool’s snipping menu at the top of your screen. - Once the snipping menu appears, you can choose between different types of snips:
- Rectangular: Click and drag to capture a rectangle.
- Freeform: Draw any shape to capture that portion of the screen.
- Window: Click on a window to capture it.
- Full-screen: Capture everything on your screen.
Once you’ve selected your snip type and taken a screenshot, it will automatically copy to your clipboard. From there, you can paste it into an image editor, document, or email, or save it directly.
Customizing a Keyboard Shortcut for the Snipping Tool
If you prefer a different or more personalized shortcut for the Snipping Tool, you can set up a custom shortcut. Here’s how to do it:
Step 1: Create a Desktop Shortcut for Snipping Tool

- Right-click on your desktop.
- Select New > Shortcut.
- In the location field, type:
explorer ms-screenclip: - Click Next, then name the shortcut (e.g., “Snipping Tool”).
- Click Finish.
Step 2: Assign a Keyboard Shortcut

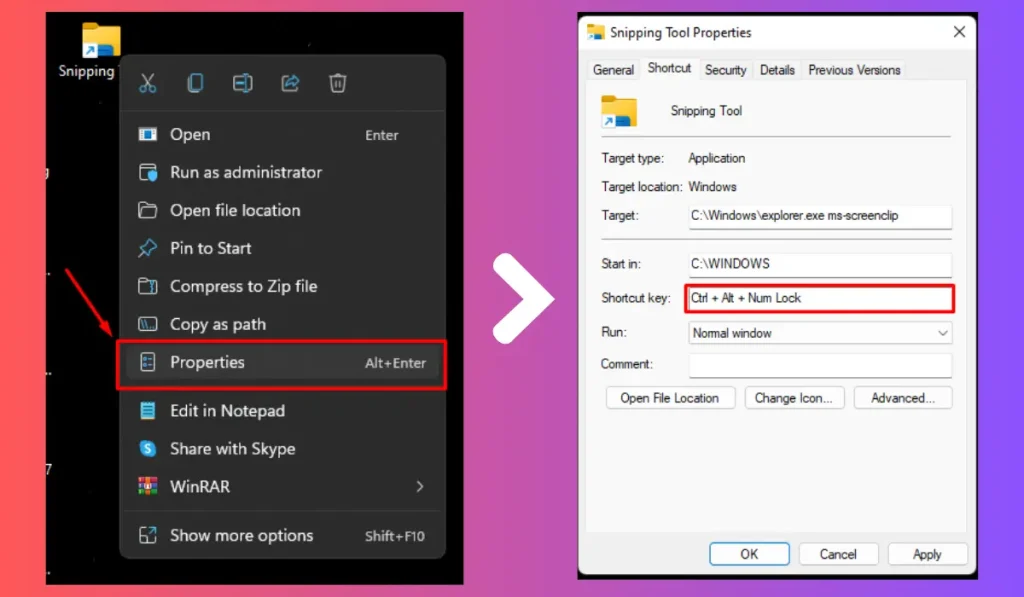
- Right-click on the new Snipping Tool shortcut you just created.
- Select Properties.
- In the Shortcut key field, enter your desired keyboard shortcut (e.g., Ctrl + Alt + S).
- Click Apply and then OK.
Now, anytime you press your custom keyboard shortcut, the Snipping Tool will open.
Why Use a Keyboard Shortcut for the Snipping Tool?
Using a keyboard shortcut to open the Snipping Tool has several benefits:
- Speed: You can quickly capture your screen without searching for the tool.
- Convenience: Instead of navigating through the start menu, you can just press a couple of keys.
- Increased productivity: Capturing screenshots becomes a seamless part of your workflow.
Troubleshooting Common Issues
If the shortcut doesn’t work as expected, here are some tips:
- Ensure the Snipping Tool is up-to-date: Windows updates sometimes change how certain features work, so ensure your Snipping Tool is the latest version.
- Check keyboard settings: If the shortcut isn’t triggering, double-check your keyboard or shortcut settings in Windows.
- Try other screenshot tools: If the built-in Snipping Tool isn’t working, you can use Snip & Sketch (built into Windows) or third-party screenshot tools like Greenshot or Lightshot.
Conclusion
Opening the Snipping Tool with a keyboard shortcut in Windows 10 and 11 is a quick and convenient way to capture screenshots. Whether you use the default Windows + Shift + S or create your own custom shortcut, you can save time and boost productivity. Start using these shortcuts today to make capturing your screen easier than ever!
What’s your favorite way to capture screenshots? Share your tips and tricks in the comments, and don’t forget to pass this guide along to anyone who might find it helpful!